| 20 |
0 |
2 |
2 |
2 |
7 |
1 |
1 |
1 |
| Where Lemmings Dare | |
|---|---|
| Statistics | |
| Difficulty | Havoc |
| Level # | 17 |
| No. of Lemmings | 80 |
| To be Saved | 97% (78 Lemmings) |
| Time | 2 Minutes |
| Level Chronology | |
| Previous | Scaling the Heights |
| Next | Lemmings in a situation |
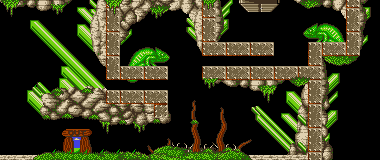
Where Lemmings Dare is the seventeenth level of Havoc, featured in Oh No! More Lemmings.
Strategy[]
The first lemming must be made a Builder the instant he lands on the steel to avoid the Chameleon Trap. Let the second lemming walk to the left towards the second Chameleon Trap while another Lemming is turned into a Blocker behind him. To avoid the second Chameleon Trap's trigger, have your Trailblazer build over the second bolt in the steel block. He will hit his head and walk back right, but once he returns and reaches the top of his unfinished ramp, continue building until you reach the other side where the Chameleon Trap is sitting.
Your Trailblazer will hit the steel wall, head back left and drop onto a small rock sticking out of the steel. From the edge of that rock, build until he collides with either the tallest sapling or the overhanging mossy rock, then have it build once to reach the steel platform underneath the second Chameleon Trap.
When your Trailblazer has just started walking up the long diagonal crystal, have it mine down and raise the release rate to 99. When your Trailblazer is just a little passed the exit's doorway, have it dig down then bomb the Blocker. The Trailblazer will likely walk passed the exit and fall to a Vine Trap, but the other lemmings should safely land directly on the exit's door.
100% strategy[]
Have the first lemming build at the second rivet after landing. The second lemming should build left between the two right rivets of the second block from the right. This will create a seal, but not before two lemmings get past it during the build. The first of those should build between the two leftmost rivets on the platform, and turn around after hitting the top layer.
The second should continue where that one left off, and bash to land on top of the sapling, immediately select builder and click rapidly at the small moss patch to start another bridge. Mine just before reaching the piece of ground under the corner. After getting past the roots, build just before reaching the top of the mound to get over the two rightmost Vine Traps. Another builder a couple steps after landing from that should complete a safe path to the exit. Max out the release rate and dig through the sealing bridge to get the rest there and save 100%.
Access codes[]
- Amiga: GAHRTDMBGD / GCIRVLKBGO
- DOS:
- Macintosh: GAIPVLIBGI
Trivia[]
- This level's name is based on the movie Where Eagles Dare.
Gallery[]
")